How to Auto Forward Emails in Outlook (& Fix Failures)
Lindy walked through auto forwarding in Outlook using both the Forwarding toggle and rules, including why it fails silently on work accounts and how to fix it.


If you've ever left for a week off and come back to a client asking why you never replied, you already know why learning how to auto forward emails in Outlook is worth ten minutes now instead of an awkward apology later.
I set up forwarding across every Outlook version Microsoft ships, new Outlook, classic Outlook, Outlook on the web, and Outlook.com, using both the Forwarding toggle and inbox rules.
Here's how each path works, which one to use for your version of Outlook, and the main reason forwarding fails without warning on work accounts.
Done right, it means a message reaches a covering colleague, an on-call teammate, or your personal inbox the moment it lands, without you lifting a finger while you're away.
What is auto forwarding in Outlook?
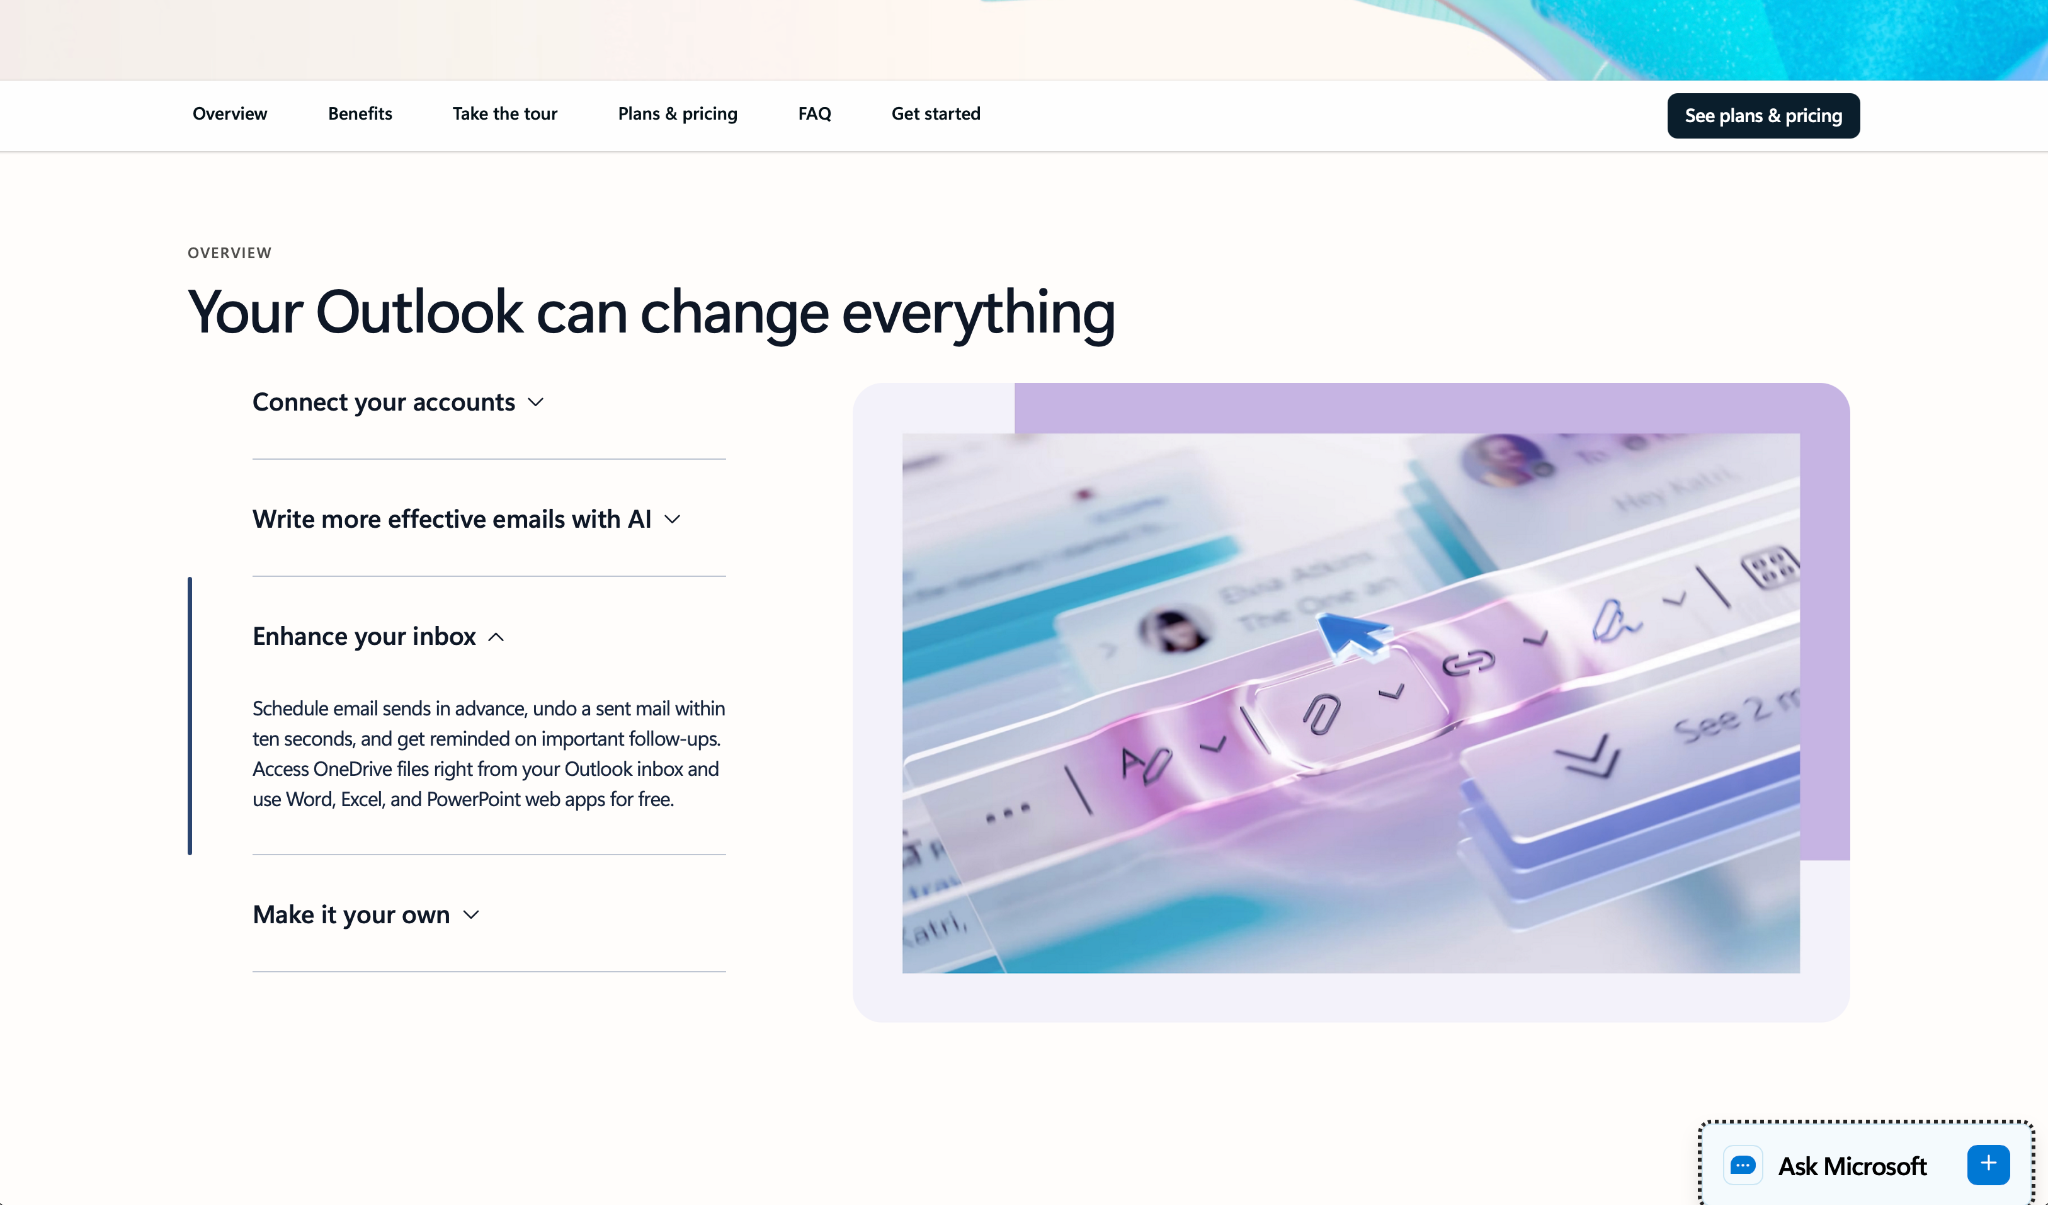
Auto forwarding tells Outlook to send incoming messages to a second address automatically, based on either a blanket setting or conditions you define. The original still arrives in your mailbox, and a copy travels onward.
Outlook offers two separate ways to set this up, and picking the right one saves you from fighting the interface.
The Forwarding toggle sends every incoming message to one address with a single switch. It lives under Settings and needs no conditions, so it's usually the quickest option when you want your whole inbox mirrored somewhere else.
Inbox rules give you control that the toggle can't. A rule can forward only messages from one sender, only those with a keyword in the subject, or forward everything if you leave the condition open. Reach for a rule when you want to auto-forward emails in Outlook selectively instead of mirroring the whole inbox.
Both the toggle and a rule let you pick how the mail travels: forward or redirect. A forward makes replies come back to you. A redirect sends them straight to the original sender. Step 5 covers when to pick each.
What you'll need before starting
Personal accounts need almost nothing. Work and school accounts may need an admin, though only for permission, never for the setup itself.
Get these before beginning:
- A destination address, where mail should land. Any provider works, including Gmail or Yahoo.
- A test recipient, a throwaway address to confirm the forward fires before you rely on it. Skipping this is how people find a broken rule three weeks and forty missed emails later.
- For a selective rule: The exact sender address or subject keyword you want to match.
- For a work or school account: Confirmation from IT that external forwarding is allowed. Many Microsoft 365 accounts block it by default, and no setup gets around a policy set at that level.
Time: Under two minutes for the toggle; five to ten for a rule. Work-account approval can add days if IT has to lift the block.
{{templates}}
How to auto forward emails in Outlook: Step-by-step
Five steps get you there. You'll identify your version and account, forward everything with the toggle, do the same with a rule, narrow that rule down to specific mail, then decide between forward and redirect.
Step 1: Identify your Outlook version and account type
Check two things before you open any settings menu. First, which Outlook you're running, and second, whether your account is personal or work/school.
The version tells you where the controls live. Your account type is the bigger question, because it decides whether those controls will work at all once you find them.
What to confirm first:
- Which Outlook you have. New Outlook for Windows, classic Outlook, Outlook on the web, and Outlook.com each put forwarding in a different place, and the Forwarding toggle only appears in some of them. If you're unsure, Microsoft's version guide settles it in a click.
- Personal or work/school. A personal Outlook.com or Microsoft 365 account forwards anywhere with no gatekeeper. A work or school account routes through your organization's Microsoft 365 tenant, where an admin may block external forwarding entirely. Knowing which one you have tells you whether to expect a smooth setup or a call to IT.
Pro tip: If you're on a work account, ask your admin about the external forwarding policy before you build anything. It's a thirty-second question that saves you from debugging a rule that was never going to fire.
Step 2: Forward every email with the Forwarding toggle
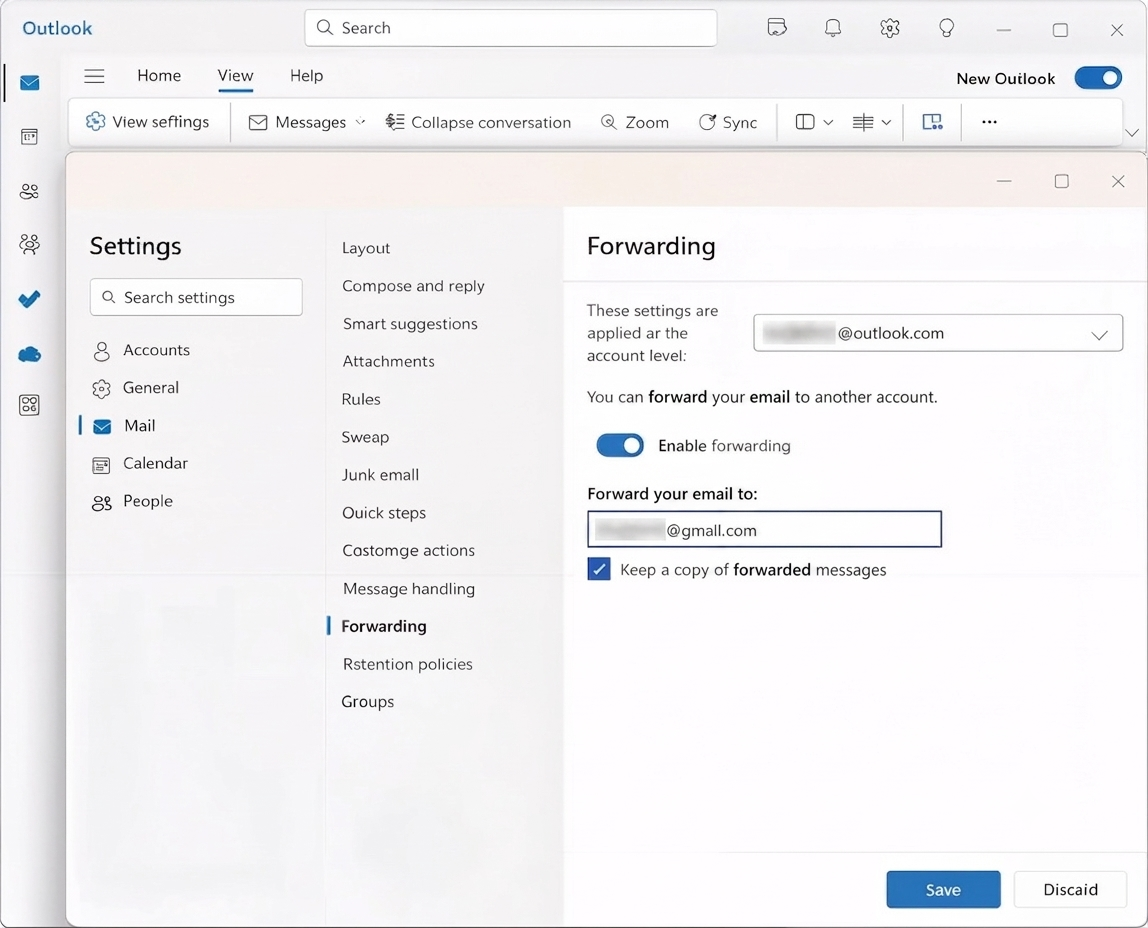
Turn on the Forwarding toggle when you want your entire inbox mirrored to one address, and you're on the new Outlook or Outlook.com. There's less to set up than with a rule.
How to turn it on in the new Outlook:
- At the top of the window, select Settings.
- Select Mail > Forwarding.
- Toggle Enable forwarding, type the destination address, and select Save.
- Decide on Keep a copy of forwarded messages. Leave it checked, and the original stays in your mailbox as a record. Uncheck it, and your inbox stays cleaner, but then you're trusting the forward to fire every time, with no backup if it doesn't.
On Outlook.com (personal Hotmail or Live accounts), the toggle sits under Settings > Mail > Forwarding, where you enable forwarding and enter the address the same way.
Classic Outlook has no Forwarding toggle at all. If that's your client, skip to the rule method in Step 3, which is the only way to set forwarding there.
Step 3: Forward every email with an inbox rule
Build a "forward everything" rule to get the same result in any Outlook version. It's the required route in classic Outlook and Outlook on the web.
How to build it in the new Outlook or Outlook on the web:
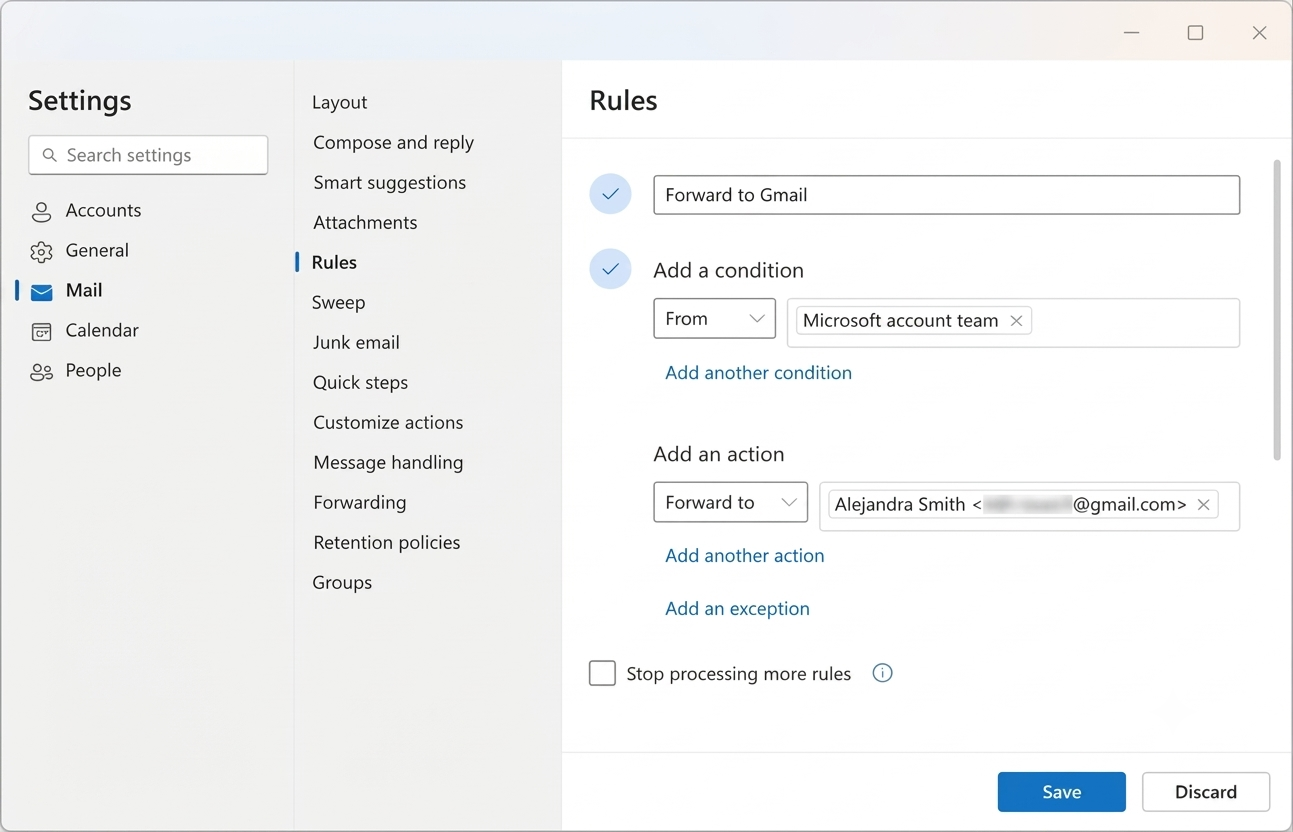
- Select Settings, then Mail > Rules.
- Select Add new rule and give it a name you'll recognize later.
- Add the condition: Apply to all messages.
- Add the action Forward to (or Forward as attachment), then enter the destination address.
- If you want later rules to leave this message alone, turn on Stop processing more rules, then select Save.
In classic Outlook for Windows, the path runs through the Rules Wizard. Go to Home > Rules > Manage Rules & Alerts > New Rule, apply the rule to messages you receive, leave conditions blank to catch everything, and set the action to forward or redirect to your destination.
Classic Outlook has one catch worth flagging. A forwarding rule runs server-side by default, so it fires whether or not the app is open.
The exception is the "On this computer only" checkbox. Turn it on, and the rule goes client-only. Now it forwards nothing unless classic Outlook is running. On an Exchange or Microsoft 365 account, leave that box unchecked so forwarding works around the clock.
Pro tip: copies of everything you forward or redirect stay in your mailbox and count against your storage quota. On a busy inbox, that adds up, and a full mailbox can stop forwarding cold, so budget for the space or prune periodically.
Step 4: Forward only specific emails
Add a condition to your rule to forward just one slice of your inbox, like invoices from a single vendor or anything from your manager. Not everyone wants their whole inbox routed elsewhere, and a scoped rule sends only what you pick.
How to narrow it:
- Open Settings > Mail > Rules (or the Rules Wizard in classic Outlook).
- Select Add new rule and name it.
- Set a condition that matches only the mail you care about, such as From a specific sender or Subject includes a keyword, instead of "apply to all messages."
- Set the action to Forward to or Redirect to, enter the address, and Save.
- Send yourself one message that matches the condition and confirm it lands where it should.
Scoping a rule this tightly is what keeps it useful instead of overwhelming. Forward every message to a personal inbox during a trip abroad, and you drown in noise. Forward only your manager's mail, and you'll see the handful of things that need you.
Step 5: Choose forward or redirect on purpose
Set the action to forward or redirect based on where you want replies to land. People skip this last decision, and picking the wrong action sends replies to the wrong inbox.
How the two differ:
- Forward: The message appears to come from you. When the recipient replies, the reply comes back to your inbox, and the original sender is out of the loop. Choose this when you want to stay in the middle of the thread.
- Redirect: The message keeps the original sender's identity. A reply goes straight to that sender, skipping you entirely. Choose this when you're handing a thread off and want to step out of it.
Which action fits depends on whether you want to stay in the conversation or exit it, so decide that first, then set the action to match.
Common mistakes to avoid
Three mistakes account for nearly every "why isn't this working" moment.
Don't trust a rule you haven't tested
Outlook sometimes saves a new rule without enabling it, so it sits in your list looking active while doing nothing. Open your rules, confirm the toggle beside the rule is on, then send a message that matches it.
Saving a rule doesn't enable it, and even an enabled rule isn't proven until a test message lands where you expect.
Don't confuse forward with redirect
Set up a forward when you meant a redirect, and every reply lands in your inbox instead of going back to the original sender. It's an easy mistake that only surfaces once someone replies and the thread routes to the wrong place.
To avoid it, match the action to whether you want to stay in the loop before you save.
Don't forget the copies pile up
Forwarded and redirected mail leaves a copy in your mailbox, and those copies count toward your storage limit.
Deleting them doesn't fully solve it either. If you delete them with a rule action, they move to Deleted Items and still count until you empty that folder.
That's why it adds up over time. Left alone for months, the buildup can push you over quota and block forwarding entirely.
{{cta}}
Advanced tips: When forwarding is blocked on work accounts
Personal accounts forward anywhere, but work and school accounts are where forwarding breaks without warning, and the cause is almost never your rule.
Microsoft 365 blocks automatic external forwarding by default. When a forwarded message hits that block, the sender gets a bounce reading "5.7.520 Access denied, Your organization does not allow external forwarding."
That bounce is the giveaway. Even a correctly configured rule won't get the mail out when this policy is in place.
Five things worth knowing before you blame yourself:
- The default is off, by design. Microsoft's outbound spam filter policy controls external forwarding, and its "Automatic - System-controlled" default now behaves as Off for all tenants under secure-by-default. Only an admin can change it through the anti-spam policy in the Microsoft Defender portal.
- The fix lives with IT. No setting inside your mailbox overrides a tenant-level block. If external forwarding matters to your role, ask your admin to permit it for your account instead of rebuilding the rule a fourth time.
- Rules live on the server, so they follow you. A forwarding rule set on desktop or web applies across every device, including the Outlook mobile app, because it runs at the mailbox level. Set it once, and it holds wherever you read mail.
- Let an admin handle shared and functional mailboxes. For a team address like info@ or support@, or a long absence lik parental leave, an admin can set forwarding centrally through the Microsoft 365 admin center: go to Users > Active users, select the user, open the Mail tab, then Manage email forwarding. That covers the whole mailbox, so for sender or subject filtering, you still want a user-side rule.
- Watch for forwarded mail landing in spam. Some receiving servers treat forwarded messages as suspicious and file them under junk, often tied to SPF or DKIM on the sending domain. If your forwards go missing, check the destination's spam folder first and mark the address as trusted before assuming the rule failed.
Where Lindy fits into an Outlook forwarding workflow
Forwarding rules make one decision and stick with it. This address goes to that destination, and the rule treats an invoice and a newsletter exactly alike, then stops as soon as it's sent the copy. Deciding which mail matters is a job the rule was never built to do.
Lindy is an AI assistant you text, and it acts on the plain-English instructions a forwarding rule can't follow.
Connect it to Outlook through the Microsoft Outlook integration, tell it in plain English what deserves your attention, and it watches the inbox and acts, so you're not routing a blind copy and hoping someone downstream notices.
The difference shows up most in a week like the one before a trip. That blanket rule would dump all 200 daily emails onto your personal address and leave you to sort them on the plane.
Instead, you text: "Send me anything from Acme, and draft holding replies for everything else." It pulls the threads that can't wait, queues the rest for your return, and messages you when something urgent comes in, all over a text rather than a settings menu.
You stay in control throughout. The assistant drafts and proposes, then waits for your approval before anything gets sent, and it's SOC 2, GDPR, and HIPAA compliant, so sensitive threads stay inside your policies.
Auto forwarding in Outlook moves the mail, and Lindy handles the sorting, drafting, and follow-up that a plain forward leaves for you. It offers a 7-day free trial if you want to try it against your own inbox.
Frequently asked questions
What is the difference between forward and redirect in Outlook?
The main difference between forward and redirect is who the message appears to come from. Forwarding shows it as coming from you and sends replies back to you. Redirecting keeps the original sender, so replies go to them.
How do I auto forward emails from a specific sender in Outlook?
Auto forward from a specific sender by creating an inbox rule at Settings > Mail > Rules with a From condition and a Forward to action. The condition limits forwarding to that sender instead of your whole inbox.
Can I auto forward emails from Outlook to a Gmail address?
Yes, you can auto forward Outlook mail to a Gmail address with no extra setup, since Outlook doesn't restrict forwarding by provider. Only your organization's forwarding policy on a work or school account can block it.
Why did my forwarded email bounce back with an organization error?
Your forwarded email bounced because Microsoft 365 blocks external forwarding by default to stop data from leaking out of the organization. The error reads "5.7.520 Access denied," and only your IT admin can lift the block.
Does auto forwarding work in the Outlook mobile app?
Yes, auto forwarding works in the Outlook mobile app because server-side rules follow your mailbox across every device. You can also create or edit rules in the app, though the menus are more condensed than on desktop.